
Do you know 37% of projects fail due to unclear goals?
Let’s say you’re leading a project to launch a new mobile app for your company’s customer support team. Different teams are working on this project. Two weeks in, things start falling apart. The developers didn’t get the latest design changes, marketing is promoting a feature that’s not ready, and leadership is asking why the project is behind schedule. Everyone’s working hard, but in different directions. No one has a single view of what’s really going on.
This is where a project poster can really help.
It’s a one-page visual summary of your entire project to remind everyone of their responsibilities and bring them on the same page.
Project managers frequently use project posters for launching a product, running a campaign or trying out a new idea. However, the poster needs to have a combination of certain elements, like text, color, CTA, etc., at their best.
In this guide, we will show you step by step how to create a project poster that actually works. We’ve also added templates and real examples to make things easy.
What is a project poster?
A project poster is a subtle, visual representation of key parts of your project. It’s like a snapshot of your project that shows what you’re trying to solve, what success looks like, and the steps to get there.
For instance, a poster for a research project usually includes your project’s name, the main problem you’re solving, your goal, target audience, possible challenges, and key success indicators. Instead of writing long documents or endless slides, the description remains short and sharp so that the audience can focus on the core message.
Let’s say your company is building a new internal tool for your support team. Without a project poster, your developers might focus on features while your support team thinks about usability. However, with a project poster, everyone sees the same goal, which aids in faster execution.
Why Project Posters Matter in Modern Project Management
Project posters are becoming a simple but effective project management communication tool. They allow teams to quickly understand goals, progress, and responsibilities without relying on lengthy documents or endless meetings.
Clear project overview for everyone
In one place, project posters give a short overview of the project’s goals, scope, and timelines. People on the team and stakeholders can quickly get the gist of the project without having to read long reports. This makes things more clear and helps everyone stay on the same page when working on a project or making decisions.
Enhances team communication and accessibility
Teams can view real-time project information visually without having to request frequent updates. This reduces the number of unnecessary meetings and follow-ups. Clear communication builds trust and lets managers keep an eye on progress without having to micromanage every little thing.
Boosts stakeholder engagement and interest
Visual project information is easier to consume than spreadsheets or emails. Stakeholders remain informed and involved because updates are easy to understand. More engagement means quicker approvals and fewer delays in project workflows.
Supports faster decision-making
You can clearly see the risks, roadblocks, and milestones for the project. Leaders can spot problems early on and do something about them before they get worse. Making decisions faster makes projects more likely to succeed while keeping schedules on track.
Enhances team accountability and ownership
A visual representation of responsibilities makes it clear who owns what for everyone. Team members know what they need to do and when they need to do it without being told. Clear accountability boosts productivity and lessens the need for managers to keep an eye on work.
Perfect for agile and remote teams
Distributed teams require quick and shared visibility into project progress. Project posters are a central place to look for information that is always available. This keeps remote work structured, organised, and profitable in many places.
Essential elements of a project poster
A good project poster is simple & visual presentation yet serves all essential information to bring clarity to your entire team. Here are the key elements of a project poster:
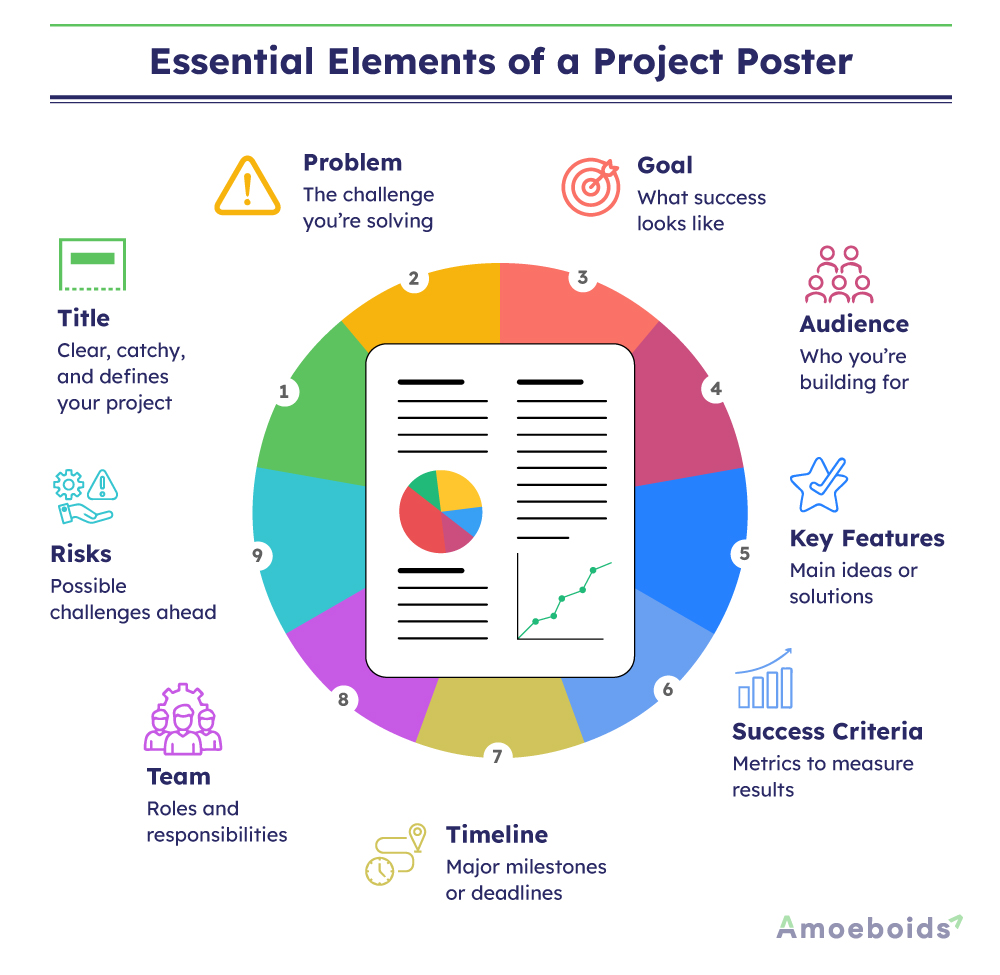
1. Project title
This is the first thing anyone will see. It should be short, clear and give a basic idea of what your project is about. Consider making it highly impactful as a good title sets the tone for the rest of the poster.
Examples:
- SupportFlow – A Tool to Speed Up Customer Query Handling
- ReadSmart – An AI-Based App to Improve Reading Speed
- FarmEase – Smart Irrigation System Using Soil Sensors
2. Problem statement
What’s the problem you’re trying to solve? This part should explain the issue in simple words. Try to keep it focused. You’re not writing a report, just a short, clear description of the challenge.
Example: “Our support team spends too much time switching between systems to respond to queries.”
3. Goal or objective
Here, you explain what you want to achieve with the project. So, it’s helpful to write this in terms of outcomes instead of just outputs.
Examples:
- Reduce average response time by 30% by building an integrated support tool.
- Improve reading speed by 25% using AI-powered personalized feedback.
- Reduce manual irrigation by 50% through automated soil-moisture-based control.
4. Target audience
User research powered by customer empathy is fundamental to guiding your design, communication, and planning decisions. It also ensures that your solution meets real needs.
5. Key features or solutions
List the main ideas or features your project will include. Don’t go into too much technical detail here, just highlight what the solution will do to solve the problem.
Example: “Single dashboard for tickets, automated responses for FAQs, live chat integration.”
6. Success criteria
How will you know the project worked? Add a few simple metrics or results that will help you measure success. These should tie back to your main goal.
Example: “30% faster response time, 20% fewer escalated tickets, 90% agent satisfaction.”
7. Timeline
People need to know when things will happen. Use this section to add high-level milestones or important deadlines. Keep it brief but realistic.
Example: “Prototype by June, Testing in July, Launch by August.”
8. Team members or roles
Mention who’s involved or which roles are responsible for what. This helps create ownership and avoids confusion later.
Example: “Design – Sarah, Development – Joshua, Testing – Chad.”
9. Potential risks or challenges
When you list possible risks, it shows that you’ve thought things through. It also helps teams stay prepared and reduce surprises.
Example: “Delay in API integration, limited user training before launch.”
With the complete clarity on the elements for your project poster, it’s time to bring everything together.
When Is the Right Time to Create a Project Poster?
The ideal time to create a project poster is during the project initiation phase, when goals, scope, stakeholders, and timelines are defined. In modern project management, it should also be updated at key milestones, sprint reviews, and when priorities shift.
Early project poster creation improves team alignment, communication, and project visibility. It allows project managers to monitor progress, manage expectations, and avoid misunderstandings throughout the project’s lifecycle.
Are Project Posters Necessary for Every Project?
Not every project needs a lot of paperwork, but every project needs to be clear. Project posters are a simple way to manage them and keep everyone on track without needing to do anything extra.
- Small and simple projects: A straightforward project poster clearly defines goals and roles for brief or one-team projects. It keeps communication structured and clear without requiring a lot of paperwork.
- Agile and fast-moving projects: Teams must have immediate visibility because agile projects undergo rapid change. A project poster allows teams to adjust more quickly and keeps stakeholders informed at all times by displaying current priorities and progress.
- Large or cross-functional projects: When several teams work together, it’s important to be clear. A project poster shows the project’s scope, dependencies, and milestones so that everyone knows what the plan is and is working toward the same goals.
Step-by-step guide to creating a project poster
The biggest challenge is how to put all the elements together in a way that actually works.
A good project poster goes beyond design and aims to arrange elements to tell a story that draws eyeballs and drives action from your target audience.
That said, here’s a step-by-step guide to help you get started on the right foot.
Step 1. Draft an outline
Designers need a rough draft of your vision to reduce rework as much as possible. So, create a rough project poster layout on paper or a blank screen. Decide where each section will go, like title, problem, goals, features, timeline, etc.
Step 2. Decide on your color scheme
Colors reflect the right emotions of your message, even before someone starts reading it.
If you’re new to design, start with the 60-30-10 color rule.
What is the 60-30-10 color rule?
This is a simple design trick. Choose three colors:
- 60% as the main background color
- 30% as your secondary color
- 10% for highlights (like call-to-action buttons or keywords)
Make sure your colors have good contrast. Don’t use too many bright shades or your poster might become hard to read.
Note: Stick to your brand colors if your company already has a style guide.
Step 3. Add your images
Use simple illustrations, product screenshots, graphs or icons that support your message.
- Avoid overloading the poster with too many images.
- Use high-quality visuals that are easy to understand.
- Keep enough white space so everything feels clean and readable.
Note: If your project involves data analysis, include a sample dashboard or before-and-after charts.
Step 4. Add your copy (text)
Try not to include too many words. Instead, focus on creating a microcopy – short, simple, and straight to the point.
- Typography matters
Use easy-to-read fonts. Avoid script or decorative fonts for main sections. Use one or two font styles across the poster, no more. - Text layout tips
- Use bold or larger font sizes for titles.
- Use bullet points for features or benefits.
- Leave enough space between lines.
- Keep paragraphs short.
Note: To check the content readability, read your copy out loud. If it sounds too formal or complex, edit it with simple words and shorter sentences.
Step 5. Create smart CTAs
If you want your poster to lead the viewer successfully to a desired action, add CTAs (call to action) that convert.
- Keep the CTA short and action-oriented.
- Use buttons or highlight the text using your accent color.
- Place it somewhere it can’t be missed, ideally at the bottom center or top right.
Just keep in mind that an effective CTA should be optimized to stand out from the background. Check this powerful CTA from Spotify.
Is the button orange? No. Do you know where to click? Yes.
Step 6. Review and get feedback
This step is often skipped, but it’s one of the most useful. Before finalising your poster:
- Ask a teammate to review it.
- Check if the message is clear in under 10 seconds.
- Make sure all the elements are aligned and readable.
Once you understand how to make a project poster, the next thing you might want is a little inspiration.
Common Mistakes to Avoid When Creating a Project Poster
Creating a project poster is simple, but minor errors can reduce its value. Avoid these common misunderstandings to ensure clear and effective communication.
- Overcrowded posters confuse readers, so include only the goals, timeline, owners, and progress for a clear picture.
- Technical jargon reduces understanding, so use simple sentences that both technical and non-technical stakeholders can understand.
- Outdated posters can lead to incorrect assumptions about progress, so keep the status, risks, and milestones updated on a regular basis.
- Unclear ownership slows down work, so make sure that each task has a clear person in charge.
- Poor layout makes reading difficult. Arrange sections with proper spacing and structure.
- Blockers should be shared early to avoid delays, as ignoring risks later leads to surprises.
Project poster templates & examples
Before creating project posters, organizations craft a pre-structured layout. These project poster templates give you a definitive guide on what to include and where. Besides, templates help you in:
- Maintaining a uniform format for all future posters
- Save time on the design part
- Avoid missing important sections like goals, audience or CTAs
Check out this project poster template by Atlassian for reference.
Overview
Define your project’s scope and problem space as per the following format.
| How does the project fit into your broader strategy? | |
| Team name | |
| Project owner | |
| Team members | |
| Date | |
| Status | NOT STARTED/ IN PROGRESS/DONE |
Problem Space
| Why are we doing this? | Add a problem statement and explain how the problem affects customers and business |
| How do we judge success? | Draft specific and measurable goals before progressing to the ‘Ready to make it’ section |
| What are possible solutions? |
Validation
| What do we already know? | |
| What do we need to answer? |
Ready to make it
| What are we doing? | |
| Why will a customer want this? | |
| Visualize the solution | Add screenshots and links that show what you’re building |
| Scale and scope | Estimate the team size (S,M,L, XL) and define what’s included and not included. |
Here are a few more project poster templates for more inspiration.
1. Template 1
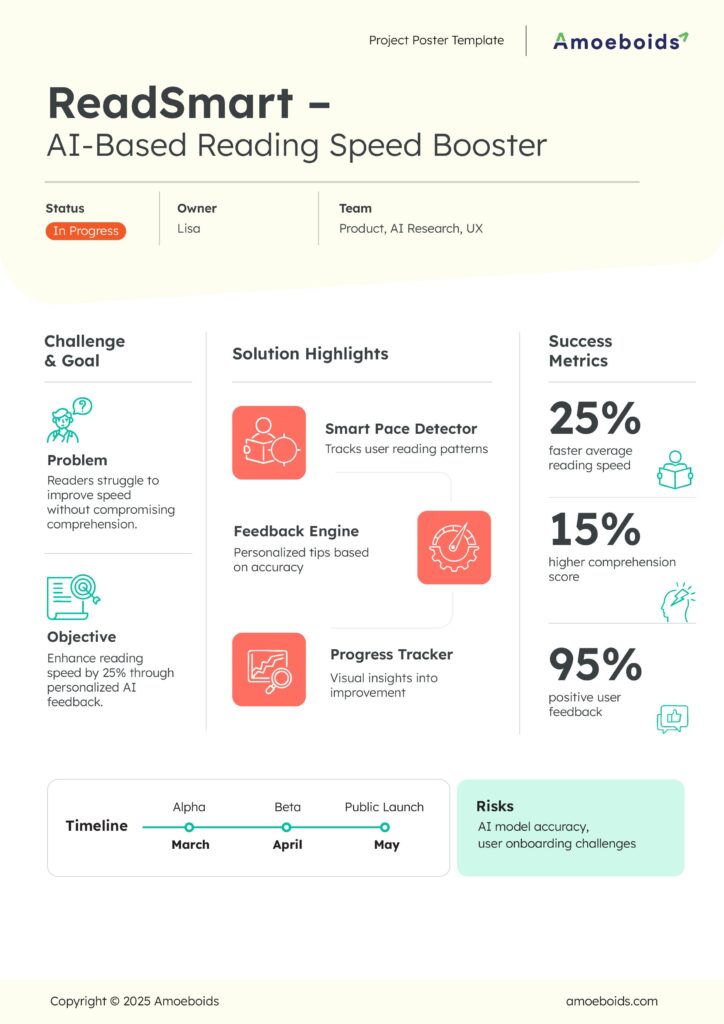
A sleek, metric-driven poster ideal for product or AI-focused projects.
It highlights the problem, the objective, and core features with bold success metrics like 25% faster reading speed and 95% positive feedback.
The clean layout makes it perfect for showcasing user impact, feature breakdowns, and clear timelines.
Example:-
Challenge & Goal
Problem:
Employees struggle to complete mandatory upskilling courses due to slow learning pace and low retention.
Objective:
Boost course completion speed by 20% using adaptive AI guidance.
Solution Highlights:
- Learning Pace Tracker: Monitors how quickly users progress through modules.
- Smart Feedback Engine: Provides personalized nudges when accuracy drops.
- Progress Insights: Visual dashboard showing improvement week by week.
Success Metrics:
📊 22% faster course completion
🧠 14% higher retention in assessments
👍 93% positive learner feedback
Timeline:
Alpha – March
Beta – April
Public Launch – May
Risks:
AI accuracy, variance in learning styles
2. Template 2
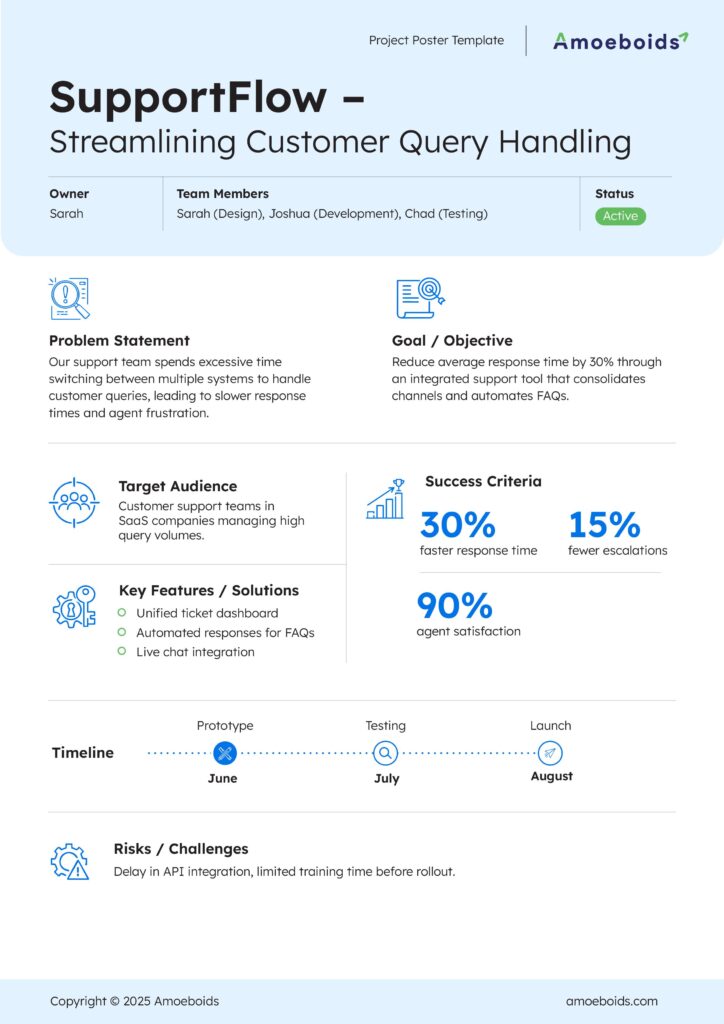
A structured, process-oriented template tailored for support, operations, or workflow optimization projects.
It clearly outlines the problem statement, goals, audience, and key features such as automated FAQs and unified dashboards.
Success metrics like 30% faster response time and 90% agent satisfaction make it great for service and efficiency-driven initiatives.
Example-
Problem Statement
Internal IT teams waste time switching between email, Slack, and ticketing tools, delaying employee issue resolution.
Goal / Objective
Reduce IT helpdesk response time by 35% using a centralised support console with automated triage.
Target Audience
IT support teams at mid-sized enterprises.
Key Features / Solutions:
- Unified ticket inbox
- Automated responses for common IT issues (password resets, VPN errors)
- Live chat widget for instant help
Success Criteria:
⏱️ 32% faster resolution
📉 18% fewer escalations
😊 91% satisfaction from internal teams
Timeline:
Prototype – June
Testing – July
Launch – August
Risks / Challenges:
Data integration delays, employee onboarding
3. Template 3
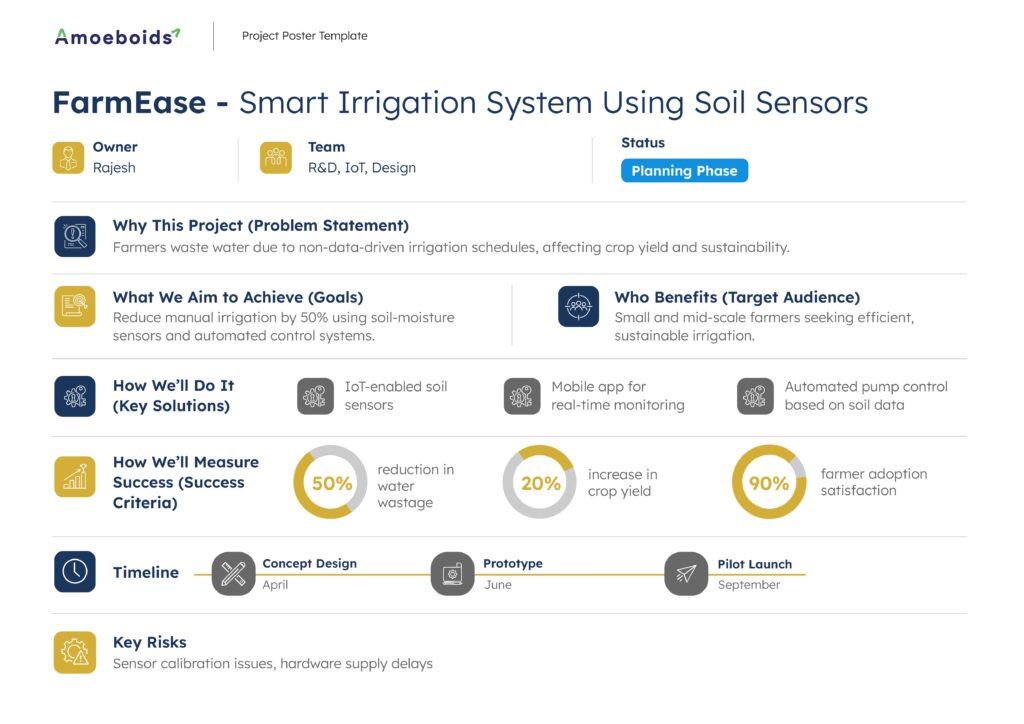
A goal-focused, data-rich template crafted for IoT, hardware, or sustainability projects.
It covers user impact, environmental benefits, and technical solutions like soil sensors and automated pumps.
Strong emphasis on measurable outcomes (50% water reduction, 20% yield increase) makes it a great fit for innovation projects with real-world impact.
Example-
Why This Project (Problem Statement)
Urban terrace gardeners waste water and struggle to maintain consistent irrigation due to irregular schedules.
What We Aim to Achieve (Goals)
Cut manual watering by 45% using sensor-driven micro-irrigation.
Who Benefits (Target Audience)
Home gardeners and small urban farms.
How We’ll Do It (Key Solutions):
- WiFi-enabled soil sensors
- Mobile app for moisture alerts
- Automated micro-irrigation system
How We’ll Measure Success (Success Criteria):
💧 48% reduction in water waste
🌿 22% improvement in plant health index
😊 90% gardener satisfaction
Timeline:
Concept Design – April
Prototype – June
Pilot Launch – September
Key Risks:
Sensor calibration issues, WiFi connectivity limitations
Project Poster vs Project Plan: What’s the Difference?
A project poster and a project plan are both project management tools, but they have very different functions. The first allows people to quickly understand the project, while the second enables teams to carry it out in detail.
| Aspect | Project Poster | Project Plan |
| Purpose | Gives a quick visual overview of the project | Provides detailed instructions to execute the project |
| Detail level | High-level summary | In-depth documentation |
| Audience | Stakeholders, leadership, and entire team | Project managers and execution team |
| Content | Goals, timeline, owners, progress, risks | Tasks, dependencies, resources, budget, and workflow |
| Usage | Communication and alignment | Planning and execution control |
| Update Frequency | Frequently updated for visibility | Updated when scope or schedule changes |
| Format | Visual, one-page, easy to read | Structured document or tool-based plan |
| Time to Understand | Few seconds | Requires careful reading |
| Main Benefit | Enhances simplicity and openness | Ensures organised execution and tracking |
Conclusion
A project poster is a simple yet powerful tool to communicate your project’s core message as well as project progress at a glance. Before you create a poster for a research project or a new product launch, learn how to creatively use different elements to make your message clear and impactful using as few words as possible.
FAQs
What are the essential elements of an effective project poster?
A good project poster includes a clear title, problem statement, goals, key visuals, timeline, and a strong call to action. These elements work together to explain your idea quickly and make it easy to understand.
How do you choose the right color scheme for a project poster?
Consider using the 60-30-10 rule that says to use 60% base color, 30% secondary color, and 10% accent color. Most importantly, you need to choose colors that match your brand, are easy on the eyes so that important points stand out clearly.
Can project posters be created using free online tools?
Yes, tools like Canva, Adobe Express, and Piktochart offer free templates that make poster creation simple. They’re easy to use, don’t need design skills, and let you customize everything to fit your project goals.
What are common mistakes to avoid when designing a project poster?
Avoid cluttered layouts, too much text, poor color contrast, and hard-to-read fonts. A messy poster can confuse your audience. Keep it clean, focused, and make sure your message is easy to follow at a glance.